# Feature guide - TypeScript SDK feature guide
> Use Temporal Nexus within the TypeScript SDK to connect Durable Executions within and across Namespaces using a Nexus Endpoint, a Nexus Service contract, and Nexus Operations.
> **Public Preview**
Use [Temporal Nexus](/evaluate/nexus) to connect Temporal Applications within and across Namespaces using a Nexus Endpoint, a Nexus Service contract, and Nexus Operations.
This page shows how to do the following:
- [Run a development Temporal Service with Nexus enabled](#run-the-temporal-nexus-development-server)
- [Create caller and handler Namespaces](#create-caller-handler-namespaces)
- [Create a Nexus Endpoint to route requests from caller to handler](#create-nexus-endpoint)
- [Define the Nexus Service contract](#define-nexus-service-contract)
- [Develop a Nexus Service and Operation handlers](#develop-nexus-service-operation-handlers)
- [Develop a caller Workflow that uses a Nexus Service](#develop-caller-workflow-nexus-service)
- [Understand exceptions in Nexus Operations](#exceptions-in-nexus-operations)
- [Cancel a Nexus Operation](#canceling-a-nexus-operation)
- [Make Nexus calls across Namespaces in Temporal Cloud](#nexus-calls-across-namespaces-temporal-cloud)
> **📝 Note:**
>
> This documentation uses source code derived from the [TypeScript Nexus sample](https://github.com/temporalio/samples-typescript/tree/main/nexus-hello).
>
## Run the Temporal Development Server with Nexus enabled
Prerequisites:
- [Install the latest Temporal CLI](https://learn.temporal.io/getting_started/typescript/dev_environment/#set-up-a-local-temporal-service-for-development-with-temporal-cli) (`v1.3.0` or higher recommended)
- [Install the latest Temporal TypeScript SDK](https://learn.temporal.io/getting_started/typescript/dev_environment/#add-temporal-typescript-sdk-dependencies) (`v1.12.3` or higher)
The first step in working with Temporal Nexus involves starting a Temporal Server with Nexus enabled.
```
temporal server start-dev
```
This command automatically starts the Temporal development server with the Web UI, and creates the `default` Namespace. It uses an in-memory database, so do not use it for real use cases.
The Temporal Web UI should now be accessible at [http://localhost:8233](http://localhost:8233), and the Temporal Server should now be available for client connections on `localhost:7233`.
## Create caller and handler Namespaces
Before setting up Nexus endpoints, create separate Namespaces for the caller and handler.
```
temporal operator namespace create --namespace my-target-namespace
temporal operator namespace create --namespace my-caller-namespace
```
For this example, `my-target-namespace` will contain the Nexus Operation handler, and you will use a Workflow in `my-caller-namespace` to call that Operation handler.
We use different namespaces to demonstrate cross-Namespace Nexus calls.
## Create a Nexus Endpoint to route requests from caller to handler
After establishing caller and handler Namespaces, the next step is to create a Nexus Endpoint to route requests.
```
temporal operator nexus endpoint create \
--name my-nexus-endpoint-name \
--target-namespace my-target-namespace \
--target-task-queue my-handler-task-queue
```
You can also use the Web UI to create the Namespaces and Nexus endpoint.
## Define the Nexus Service contract
Defining a clear contract for the Nexus Service is crucial for smooth communication.
In this example, there is a service package that describes the Service and Operation names along with input/output types for caller Workflows to use the Nexus Endpoint.
Each [Temporal SDK includes and uses a default Data Converter](https://docs.temporal.io/dataconversion).
The default data converter encodes payloads in the following order: Null, Byte array, and JSON.
In a polyglot environment, that is where more than one language and SDK is being used to develop a Temporal solution, JSON is a common choice.
This example uses plain TypeScript objects, serialized into JSON.
Note: By default, the TypeScript SDK [does not support Protobuf JSON encoding](https://typescript.temporal.io/api/interfaces/common.PayloadConverter). If passing Protobuf payloads use the [ProtobufJsonPayloadConverter](https://typescript.temporal.io/api/classes/protobufs.ProtobufJsonPayloadConverter) instead.
[nexus-hello/src/api.ts](https://github.com/temporalio/samples-typescript/blob/main/nexus-hello/src/api.ts)
```ts
import * as nexus from 'nexus-rpc';
export const helloService = nexus.service('hello', {
/**
* Return the input message, unmodified. In the present sample, this Operation
* will be implemented using the Synchronous Nexus Operation handler syntax.
*/
echo: nexus.operation(),
/**
* Return a salutation message, in the requested language. In the present sample,
* this Operation will be implemented by starting the `helloWorkflow` Workflow.
*/
hello: nexus.operation(),
});
export interface EchoInput {
message: string;
}
export interface EchoOutput {
message: string;
}
export interface HelloInput {
name: string;
language: LanguageCode;
}
export interface HelloOutput {
message: string;
}
export type LanguageCode = 'en' | 'fr' | 'de' | 'es' | 'tr';
```
## Develop a Nexus Service handler and Operation handlers
A Nexus Service handler is defined using the `nexus-rpc`'s [`serviceHandler`](https://nexus-rpc.github.io/sdk-typescript/functions/serviceHandler.html) function.
Nexus Service handlers are typically defined in the same Worker as the underlying Temporal primitives they abstract.
A Service handler must provide Operation handlers for each Operation declared by the Service.
Operation handlers can decide if a given Nexus Operation will be synchronous or asynchronous.
They can invoke underlying Temporal primitives such as a Query, Signal, or Update using the Temporal SDK Client, or run other reliable code.
Handlers should be reliable since the [circuit breaker](/nexus/operations#circuit-breaking) trips after 5 consecutive retryable errors, blocking all Operations from the caller to that Endpoint.
The `@temporalio/nexus` package provides utilities to help create Nexus Operations that interact with a Temporal namespace:
- `WorkflowRunOperationHandler` - Create an asynchronous operation handler that starts a Workflow.
- `getClient()` - Get a Temporal Client connected using the same `NativeConnection` as the present Temporal Worker.
It can be used to implement synchronous handlers backed by Temporal primitives such as Signals and Queries.
### Develop a Synchronous Nexus Operation handler
Simple RPC handlers can be implemented as synchronous Nexus Operation handlers, which is defined in TypeScript as a simple async function.
Use `getClient()` from `@temporalio/nexus` to get the Temporal Client for signaling, querying, and listing Workflows.
Implementations can also make other calls, but handlers should be reliable to avoid tripping the [circuit breaker](/nexus/operations#circuit-breaking).
[nexus-hello/src/service/handler.ts](https://github.com/temporalio/samples-typescript/blob/main/nexus-hello/src/service/handler.ts)
```ts
import * as nexus from 'nexus-rpc';
// ...
import { helloService, EchoInput, EchoOutput, HelloInput, HelloOutput } from '../api';
// ...
export const helloServiceHandler = nexus.serviceHandler(helloService, {
echo: async (ctx, input: EchoInput): Promise => {
// A simple async function can be used to defined a Synchronous Nexus Operation.
// This is often sufficient for Operations that simply make arbitrary short calls to
// other services or databases, or that perform simple computations such as this one.
//
// You may also access a Temporal Client by calling `temporalNexus.getClient()`.
// That Client can be used to make arbitrary calls, such as signaling, querying,
// or listing workflows.
return input;
},
// ...
});
```
### Use the Temporal Client for Signals, Queries, and Updates
A common pattern is to use the Temporal Client from within a sync handler to Signal, Query, or Update a Workflow.
You can also use Signal-With-Start or Update-With-Start to ensure the Workflow is started and send it a Signal or Update.
All calls must complete within the [Nexus request timeout](/cloud/limits#nexus-operation-request-timeout).
The handler receives an AbortSignal via `ctx.abortSignal` that is triggered when the deadline is exceeded
— pass it to Temporal Client calls to ensure they are canceled if the timeout is reached.
Updates should be short-lived to stay within this deadline.
The handler context also exposes `ctx.requestDeadline` as an optional `Date`, representing the time by which the current request must complete.
Note that this is the deadline for the current _request_, not the overall operation.
Use it to make decisions about whether to start work that may not finish in time, or to set timeouts on downstream calls.
The [nexus_messaging](https://github.com/temporalio/samples-typescript/tree/main/nexus-messaging) sample shows how to create a Nexus Service that uses synchronous operations to send Updates and Queries.
Use the Nexus library, as shown below, to get the Client that the Worker was initialized with. In this example, the Workflow Id is derived from the client Id, with the "workflowIdForUser" method. This converts a given client Id (in this case, the client is passing in a user ID) into a Workflow Id.
This way the client only needs the identifier it cares about.
[nexus-messaging/src/callerpattern/service/handler.ts](https://github.com/temporalio/samples-typescript/blob/main/nexus-messaging/src/callerpattern/service/handler.ts)
```ts
import * as temporalNexus from '@temporalio/nexus';
function workflowIdForUser(userId: string): string {
return `GreetingWorkflow_for_${userId}`;
}
export const nexusGreetingServiceHandler = nexus.serviceHandler(nexusGreetingService, {
getLanguages: async (ctx, input: GetLanguagesInput) => {
const client = temporalNexus.getClient();
const handle = client.workflow.getHandle(workflowIdForUser(input.userId));
return await handle.query(getLanguagesQuery);
},
...
```
There are two examples of messaging through Nexus in the sample code, [caller pattern](https://github.com/temporalio/samples-typescript/tree/main/nexus-messaging/src/callerpattern) and [on-demand pattern](https://github.com/temporalio/samples-typescript/tree/main/nexus-messaging/src/ondemandpattern).
The caller pattern shows how to send messages to an existing Workflow, while the on-demand pattern shows how to start a Workflow through Nexus and then send Signals to it.
### Develop an Asynchronous Nexus Operation handler to start a Workflow
Use `@temporalio/nexus`'s `WorkflowRunOperationHandler` helper class to easily expose a Temporal Workflow as a Nexus Operation.
Note that even though a Nexus operation can only take one input parameter, if you need to pass
multiple arguments through to the workflow, you can do so by using multiple properties of the input object, and placing them in
the array provided to the `args` option when calling `startWorkflow`.
[nexus-hello/src/service/handler.ts](https://github.com/temporalio/samples-typescript/blob/main/nexus-hello/src/service/handler.ts)
```ts
import * as nexus from 'nexus-rpc';
import * as temporalNexus from '@temporalio/nexus';
import { helloService, EchoInput, EchoOutput, HelloInput, HelloOutput } from '../api';
import { helloWorkflow } from './workflows';
// ...
export const helloServiceHandler = nexus.serviceHandler(helloService, {
// ...
hello: new temporalNexus.WorkflowRunOperationHandler(
// WorkflowRunOperationHandler takes a function that receives the Operation's context and input.
// That function can be used to validate and/or transform the input before passing it to
// the Workflow, as well as to customize various Workflow start options as appropriate.
// Call temporalNexus.startWorkflow() to actually start the Workflow from inside the
// WorkflowRunOperationHandler's delegate function.
async (ctx, input: HelloInput) => {
return await temporalNexus.startWorkflow(ctx, helloWorkflow, {
args: [input],
// Workflow IDs should typically be business-meaningful IDs and are used to dedupe workflow starts.
// For this example, the workflow handles the greeting request for a given person and language pair.
workflowId: workflowIdForHello(input),
// Task queue defaults to the task queue this Operation is handled on.
});
},
),
});
```
Workflow IDs should typically be business-meaningful IDs and are used to dedupe Workflow starts.
In general, the ID should be passed in the Operation input as part of the Nexus Service contract.
> **💡 Tip:**
> RESOURCES
>
> [Attach multiple Nexus callers to a handler Workflow](/nexus/operations#attaching-multiple-nexus-callers) with a Conflict-Policy of Use-Existing.
>
### Register your Nexus Service handler in a Worker
After developing an asynchronous Nexus Operation handler to start a Workflow, the next step is to register your Nexus Service handler in a Worker.
[nexus-hello/src/service/worker.ts](https://github.com/temporalio/samples-typescript/blob/main/nexus-hello/src/service/worker.ts)
```ts
import { Worker, NativeConnection } from '@temporalio/worker';
import { helloServiceHandler } from './handler';
// ...
const namespace = 'my-target-namespace';
const serviceTaskQueue = 'my-handler-task-queue';
const worker = await Worker.create({
connection,
namespace,
taskQueue: serviceTaskQueue,
workflowsPath: require.resolve('./workflows'),
nexusServices: [helloServiceHandler],
});
```
## Develop a caller Workflow that uses the Nexus Service
To execute a Nexus Operation from a Workflow, import the necessary service definition types, then use `@temporalio/workflow`'s `createNexusServiceClient` to create a Nexus client for that service.
You will need to provide the Nexus Endpoint name, which you registered previously in [Create a Nexus Endpoint to route requests from caller to handler](#create-nexus-endpoint).
[nexus-hello/src/caller/workflows.ts](https://github.com/temporalio/samples-typescript/blob/main/nexus-hello/src/caller/workflows.ts)
```ts
import * as wf from "@temporalio/workflow";
import { helloService, LanguageCode } from "../service/api";
const HELLO_SERVICE_ENDPOINT = "hello-service-endpoint-name";
export async function helloCallerWorkflow(name: string, language: LanguageCode): Promise {
const nexusClient = wf.createNexusServiceClient({
service: helloService,
endpoint: HELLO_SERVICE_ENDPOINT,
});
const helloResult = await nexusClient.executeOperation(
"hello",
{ name, language },
{ scheduleToCloseTimeout: "10s" }
);
return helloResult.message;
}
```
### Register the caller Workflow in a Worker and start the caller Workflow
This Workflow can be registered with a Worker and started using `client.startWorkflow()` or `client.executeWorkflow()`, as usual.
Refer to the [complete TypeScript sample](https://github.com/temporalio/samples-typescript/blob/main/nexus-hello) for reference.
- [nexus-hello/src/caller/worker.ts](https://github.com/temporalio/samples-typescript/blob/main/nexus-hello/src/caller/worker.ts) shows how to register the caller Workflow in a Worker and run the Worker.
- [nexus-hello/src/starter.ts](https://github.com/temporalio/samples-typescript/blob/main/nexus-hello/src/starter.ts) shows how to use a Temporal Client to execute the sample caller Workflow.
## Exceptions in Nexus operations
Temporal provides general guidance on [Errors in Nexus operations](https://docs.temporal.io/references/failures#errors-in-nexus-operations).
In TypeScript, there are three Nexus-specific exception classes:
- `nexus-rpc`'s [`OperationError`](https://nexus-rpc.github.io/sdk-typescript/classes/OperationError.html): this is the exception type you should throw in a Nexus operation to indicate that it has failed according to its own application logic and should not be retried.
- `nexus-rpc`'s [`HandlerError`](https://nexus-rpc.github.io/sdk-typescript/classes/HandlerError.html): you can throw this exception type in a Nexus operation with a specific [HandlerErrorType](https://nexus-rpc.github.io/sdk-typescript/types/HandlerErrorType.html). The error will be marked as either retryable or non-retryable according to the type, following the [Nexus spec](https://github.com/nexus-rpc/api/blob/main/SPEC.md#predefined-handler-errors). The non-retryable handler error types are `BAD_REQUEST`, `UNAUTHENTICATED`, `UNAUTHORIZED`, `NOT_FOUND`, `NOT_IMPLEMENTED`; the retryable types are `RESOURCE_EXHAUSTED`, `INTERNAL`, `UNAVAILABLE`, `UPSTREAM_TIMEOUT`.
- `@temporalio/nexus`'s [`NexusOperationFailure`](https://typescript.temporal.io/api/classes/common.NexusOperationFailure): this is the error thrown inside a Workflow when a Nexus operation fails for any reason. Use the `cause` attribute on the exception to access the cause chain.
## Canceling a Nexus Operation
Nexus Operations, just like other cancellable APIs provided by the `@temporalio/workflow` package, execute within Cancellation Scopes.
Requesting cancellation of a Cancellation Scope results in requesting cancellation for all cancellable operations owned by that scope.
The Workflow itself defines the root Cancellation Scope.
Requesting cancellation of the Workflow therefore propagates the cancellation request to all cancellable operations started by that workflow, including Nexus Operations.
To provide more granular control over cancellation of a specific Nexus Operation, you may explicitly create a new Cancellation Scope, and start the Nexus Operation from within that scope.
An example demonstrating this can be found at our [nexus cancellation sample](https://github.com/temporalio/samples-typescript/tree/main/nexus-cancellation).
Only asynchronous operations can be canceled in Nexus, since cancellation is sent using an operation token.
The Workflow or other resources backing the operation may choose to ignore the cancellation request.
Once the caller Workflow completes, the caller's Nexus Machinery will not make any further attempts to cancel operations that are still running.
It's okay to leave operations running in some use cases.
To ensure cancellations are delivered, wait for all pending operations to finish before exiting the Workflow.
## Make Nexus calls across Namespaces in Temporal Cloud
This section assumes you are already familiar with how to connect a Worker to Temporal Cloud.
The `tcld` CLI is used to create Namespaces and the Nexus Endpoint, and mTLS client certificates will be used to securely connect the caller and handler Workers to their respective Temporal Cloud Namespaces.
### Install the latest `tcld` CLI and generate certificates
To install the latest version of the `tcld` CLI, run the following command (on macOS):
```
brew install temporalio/brew/tcld
```
If you don't already have certificates, you can generate them for mTLS Worker authentication using the command below:
```
tcld gen ca --org $YOUR_ORG_NAME --validity-period 1y --ca-cert ca.pem --ca-key ca.key
```
These certificates will be valid for one year.
### Create caller and handler Namespaces
Before deploying to Temporal Cloud, ensure that the appropriate Namespaces are created for both the caller and handler.
If you already have these Namespaces, you don't need to do this.
```
tcld login
tcld namespace create \
--namespace \
--cloud-provider aws \
--region us-west-2 \
--ca-certificate-file 'path/to/your/ca.pem' \
--retention-days 1
tcld namespace create \
--namespace \
--cloud-provider aws \
--region us-west-2 \
--ca-certificate-file 'path/to/your/ca.pem' \
--retention-days 1
```
Alternatively, you can create Namespaces through the UI: [https://cloud.temporal.io/namespaces](https://cloud.temporal.io/namespaces).
### Create a Nexus Endpoint to route requests from caller to handler
To create a Nexus Endpoint you must have a Developer account role or higher, and have NamespaceAdmin permission on the `--target-namespace`.
```
tcld nexus endpoint create \
--name \
--target-task-queue my-handler-task-queue \
--target-namespace \
--allow-namespace \
--description-file description.md
```
The `--allow-namespace` is used to build an Endpoint allowlist of caller Namespaces that can use the Nexus Endpoint, as described in Runtime Access Control.
Alternatively, you can create a Nexus Endpoint through the UI: [https://cloud.temporal.io/nexus](https://cloud.temporal.io/nexus).
## Observability
### Web UI
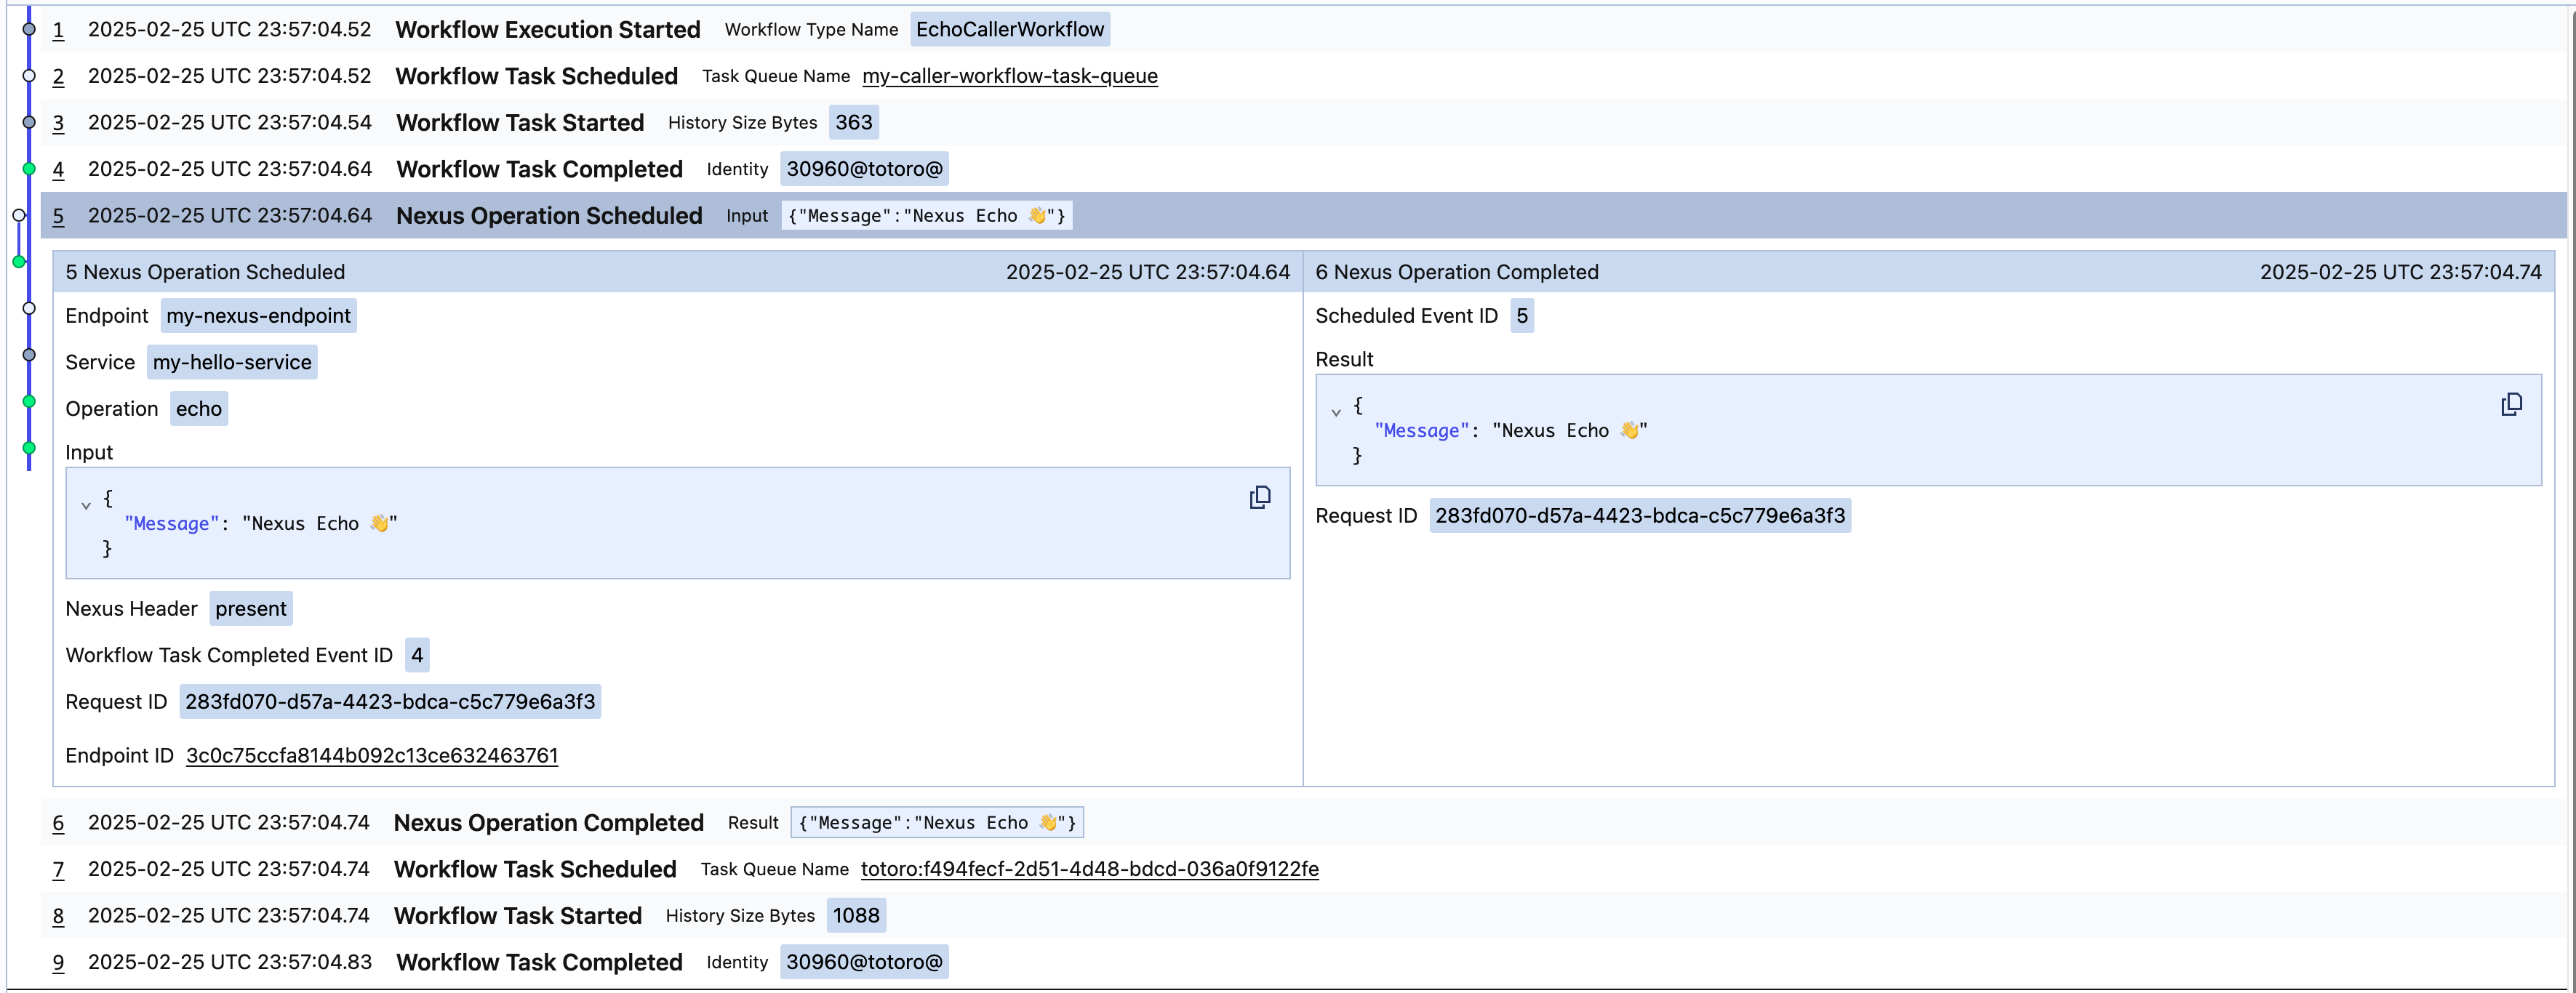
A synchronous Nexus Operation will surface in the caller Workflow as follows, with just `NexusOperationScheduled` and `NexusOperationCompleted` events in the caller's Event history:
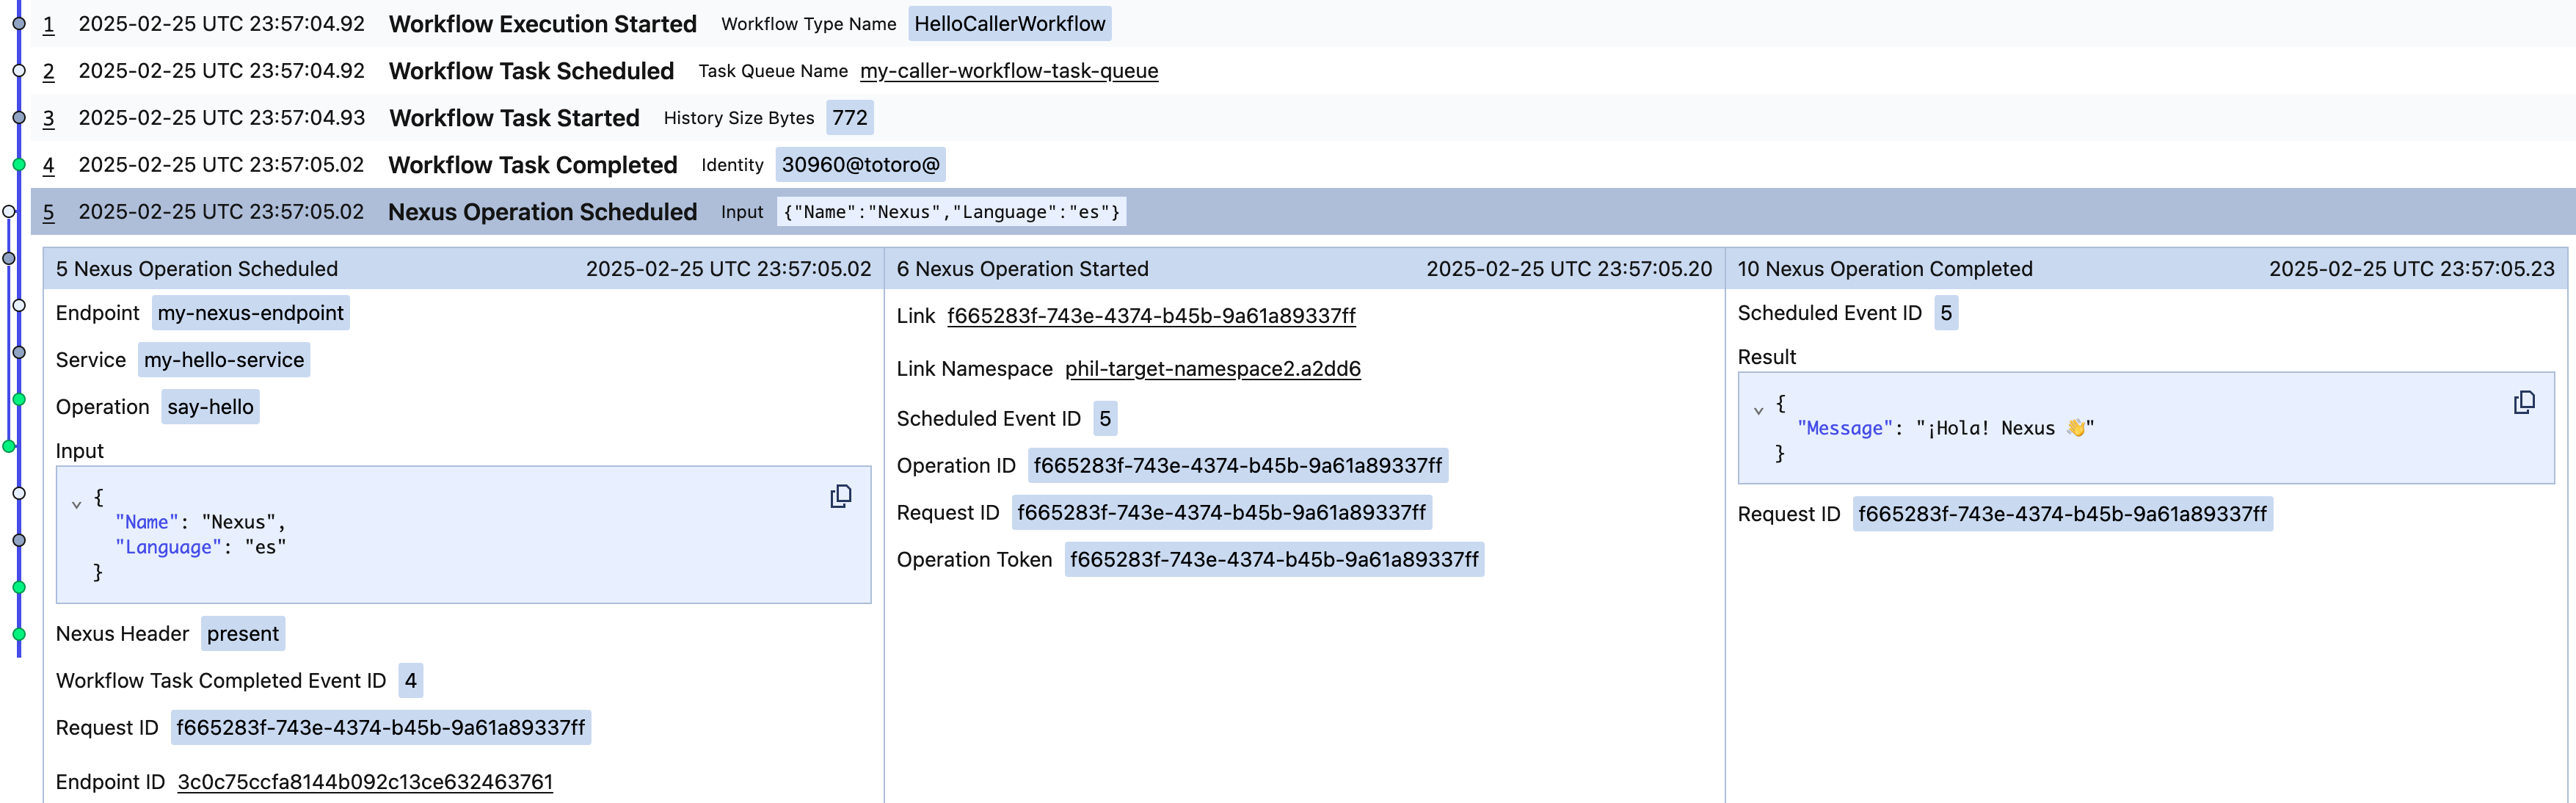
An asynchronous Nexus Operation will surface in the caller Workflow as follows, with `NexusOperationScheduled`, `NexusOperationStarted`, and `NexusOperationCompleted`, in the caller's Event history:
### Temporal CLI
Use the `workflow describe` command to show pending Nexus Operations in the caller Workflow and any attached callbacks on the handler Workflow:
```
temporal workflow describe -w
```
Nexus events are included in the caller's Event history:
```
temporal workflow show -w
```
For **asynchronous Nexus Operations** the following are reported in the caller's history:
- `NexusOperationScheduled`
- `NexusOperationStarted`
- `NexusOperationCompleted`
For **synchronous Nexus Operations** the following are reported in the caller's history:
- `NexusOperationScheduled`
- `NexusOperationCompleted`
> **📝 Note:**
>
> `NexusOperationStarted` isn't reported in the caller's history for synchronous operations.
>
### OpenTelemetry
The `@temporalio/interceptors-opentelemetry` package supports Nexus Operations, providing automatic trace context propagation across Nexus boundaries from the caller Workflow to the handler.
The easiest way to enable it is with the `OpenTelemetryPlugin`, which auto-registers Nexus interceptors alongside Activity and Workflow interceptors:
```ts
import { OpenTelemetryPlugin } from '@temporalio/interceptors-opentelemetry';
const plugin = new OpenTelemetryPlugin({
resource: myResource,
spanProcessor: mySpanProcessor,
});
const worker = await Worker.create({
// ...
plugins: [plugin],
nexusServices: [myServiceHandler],
});
```
The plugin creates the following spans:
- **Caller side:** `StartNexusOperation:service/operation` — created when the caller Workflow starts a Nexus Operation.
- **Handler side:** `RunStartNexusOperation:service/operation` and `RunCancelNexusOperation:service/operation` — created when the handler processes the operation. These spans are children of the caller span, linked via trace context propagated in Nexus request headers.
See the [interceptors-opentelemetry sample](https://github.com/temporalio/samples-typescript/tree/main/interceptors-opentelemetry) for a complete example.
For custom interceptor logic beyond tracing (e.g., logging, authorization), see [Nexus interceptor registration](/develop/typescript/workers/interceptors#nexus-interceptor-registration).
## Learn more
- Read the high-level description of the [Temporal Nexus feature](/evaluate/nexus) and watch the [Nexus keynote and demo](https://youtu.be/qqc2vsv1mrU?feature=shared&t=2082).
- Learn how Nexus works in the [Nexus deep dive talk](https://www.youtube.com/watch?v=izR9dQ_eIe4) and [Encyclopedia](/nexus).
- Deploy Nexus Endpoints in production with [Temporal Cloud](/cloud/nexus).